Community meeting in Cologne, Germany

30th of March we are organizing community meeting in Cologne.
Meeting will be held in Microsoft Campus, Holzmarkt 2a, 50676 Cologne
We are starting from 16:30, and at 17:30 we will start with Build Keynote Broadcasting

If you have interes for community, Build conference or pizza and beer feel free to join us

Agenda and registration is here:

https://www.eventbrite.de/e/build-viewing-community-treffen-tickets-21431269504


Community event in Cologne Germany

Good day current or future community members.

We are planning a small community meeting in Cologne, Germany. Meeting will occurred at 29.09.2015 in Microsoft Deutschland, Cologne. Address is Am Holzmarkt 2a, 50676 Cologne (Köln)

We are starting at 15:00 till 22:00

Timeline:

  1. Session: Win­dows 10
  2. Session: Azure
  3. Azu­re­Con live broadcast from different sessions

During event there will be food and drinks for free (this is why we all love community 🙂 ). We considering to order pizza but any other suggestions will be gladly accepted.

As we have limited number of seats please register through Eventbrite: https://www.eventbrite.de/e/community-treffen-im-rahmen-der-azurecon-tickets-18591214824

Skype for Business upgrade

Regarding all hype about Skype for Business last days her is short overview about it

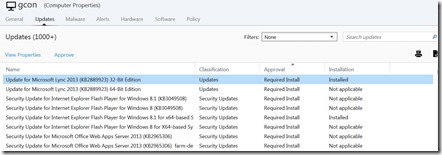
  1. Skype for Business is available as upgrade for Lync client.
  2. Upgrade is available from 15th of April as KB2889923.

S4BKB28899233.

Knowing which KB is bring this change, System Administrators or responsible persons for updates will be able to control will this update will be applied or not. This will give most of companies time to adopt and test new functionalities of Skype for Business.

Automated SQL installation for SharePoint server (Using PowerShell or Batch)

As we all know that SharePoint needs SQL server in background one of the important topic is what we need to install it and how. Especially if we have more than one farm intention is to install all SQL with same configuration. Best way to do it by using configuration file.

First we need to copy all installation binaries to location on a local or a network hard drive. Then you need to put configuration file to same location as well. And for a final step you need to run setup.exe with config file parameters.

Continue reading

CM 12 R2 Prerequisites on Server 2012 R2

In a next couple of posts I will try to share automated scripts for various installations. First of them will be for installing all prerequisites for installation of System Center Configuration Manager 2012 R2 on Windows Server 2012 R2

Script is simple and code will be shown here, but at the bottom of this post you can find download link so you don’t need to type script.

NOTE: In this script you need to be adjust path to configuration file and name of configuration file if you will use other than this

Open PowerShell and type:

Install-WindowsFeature –ConfigurationFilePath <CM12Prereqs.xml>

(mine is looking like this:

Install-WindowsFeature -ConfigurationFilePath ./CM12Prereqs.xml)

Here you can find .ps1 and .xml file for download as a .zip file CM12Prereqs.zip
More about this can be foud here

Manually updating Symantec AV for Sharepoint

If you will have need that you want to manually update Symantec Antivirus for SharePoint servers you can use existing definitions.

Main reason is that if you have Symantec Endpoint Protection, you are using Symantec Endpoint Protection Manager. For updating Antivirus for SharePoint you need to have Live Update server. From my point of view there is no common sense to have two “update” servers in same environment, one for every product, especially when both products are using same definition packages.

So in that case you can/want do it manualy.  Simple copy/paste can do the trick, but still you need to have this scripted. Biggest issue is how to deal with definition update folder from where you want to copy it, because it have name based on date (20140121.003).

Here is script example and inside you can find example how I was resolve this:

echo
::stopping Symantec Protection Engine service
Net Stop symcscan
::Wait 20 seconds till service is stopped
timeout /t 20
::continue with script
::Copy from: “C:\ProgramData\Symantec\Symantec Endpoint Protection\CurrentVersion\Data\Definitions\VirusDefs\%date:~6,4%%date:~3,2%*”
::Syntax %date:~6,4%%date:~3,2%* throws result yyyymm in folder name and * replace any other characters what will continue (for example: dd.xxx)
::At the end should be folder with date in name (20131113.xxx)
::Copy To: “C:\Program Files (x86)\Symantec\Scan Engine\Definitions\AntiVirus\VirusDefs”
::Use switches for confirming overwrite and to copy all files with all attributes
::Used switches:
::  /R           Overwrites read-only files.
::  /Y           Suppresses prompting to confirm you want to overwrite an
::               existing destination file.
::  /Q           Does not display file names while copying.
::  /I           If destination does not exist and copying more than one file,
::               assumes that destination must be a directory.
::Navigate to “C:\ProgramData\Symantec\Symantec Endpoint Protection\CurrentVersion\Data\Definitions\VirusDefs\%date:~6,4%%date:~3,2%*”
CD “C:\ProgramData\Symantec\Symantec Endpoint Protection\CurrentVersion\Data\Definitions\VirusDefs\%date:~6,4%%date:~3,2%*”
::copy all files from this directory to destination
xcopy *.* “C:\Program Files (x86)\Symantec\Scan Engine\Definitions\AntiVirus\VirusDefs\” /Y /Q
::Wait 20 seconds until copying is over
timeout /t 20
::Start Symantec Protection Engine Service
net start symcscan

Later on script was scheduled with good old AT.
Syntax:

AT 21:00 /every:M,T,W,Th,F,S,Su “C:\Folder\SymUpdTask.bat

In current age this way of updating can easily be called Retro 🙂

Cheers
Dubravko


New Blog post series In the Cloud

Last week Microsoft was released whole 2012 R2 (Windows Server and System Center) series, Windows 8.1 and SQL 2014 in preview version. After this Microsoft’s Brad Anderson, Corporate Vice President, Windows Server and System Center start with series of blog posts called In The Cloud. In this series of blog posts you will be able to find latest technical details about new products.

In first post Brad Anderson explains what is new and how is this connected with client custom specific scenario.

Plan, Design, Implement, Review and Stabilize is one of many topics which Brad was covered in his first post.

In next 8 weeks lot of content will came from Brad Anderson and I will try to keep you informed about all this news an provide you with valid hyperlink to Brad Anderson’s post

First post you can find here: http://blogs.technet.com/b/in_the_cloud/archive/2013/07/03/what-s-new-in-2012-r2-beginning-and-ending-with-customer-specific-scenarios.aspx

System Center 2012 R2 and Windows Server 2012 R2

Microsoft has announced preview version of whole new System Center 2012 R2 suite.

You can download evaluation version together with Windows Server 2012 R2 preview here

http://www.microsoft.com/en-us/server-cloud/system-center/system-center-2012-r2.aspx

http://www.microsoft.com/en-us/server-cloud/windows-server/windows-server-2012-r2.aspx

Windows Intune – part 4. – Adding domains. (survival guide)

Hi all

I didn’t write for last month and half. Why? I had some very positive tremors in my life, and good news is on the way. Just watch my LinkedIn profile Smiješak

At 3rd April I will have presentation about Private Cloud based on System Center 2012 tools at MS NetWork 3.0 conference. More info about conference can be founded here www.msnetwork.ba

At the end of April I will have another one presentation. This one will be at WinDays 13, and I will speak about System Center Configuration Manager 2012 and Windows Intune. More info about WinDays 13 can be founded here www.windays.hr.

Link to both conference can be founded at right side of my blog (under logos).

I’m still working a lot with Windows Intune, so my today post is describing how to add your personal domain to Windows Intune.

First log in to https://account.manage.microsoft.com (portal for adding/manage users and groups)

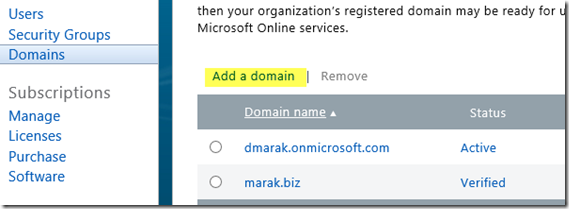
Then go to Domains on your left side and click “Add a domain”.

clip_image001

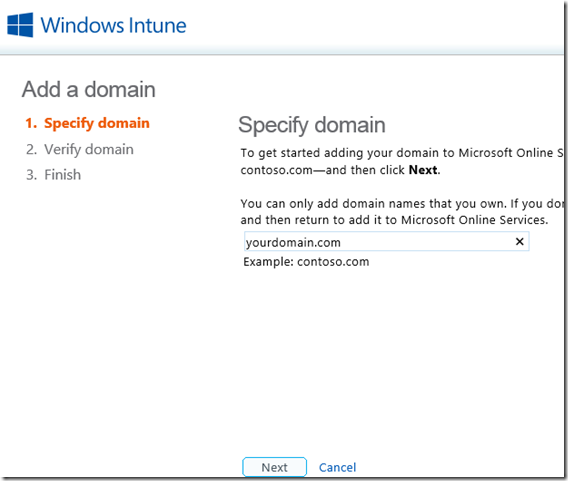
New window will open and in this window you must specify domain you want to add in your Windows Intune subscription

clip_image002

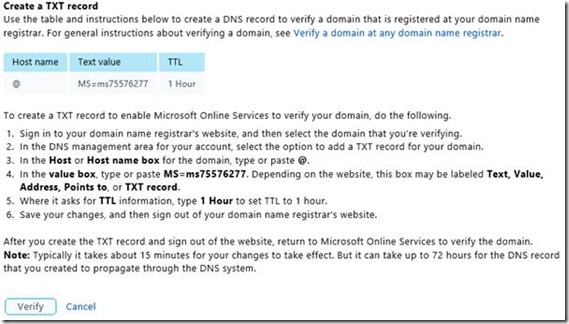
Click “Next”. Now you have to add host record in your DNS server. Host record varies and it is different for every domain and Windows Intune subscription. TTL time must be 1 hour. Here is example.

clip_image004

After you done that. Don’t click “verify”! Wait, about 30 minutes and then click “Verify”. In most cases your domain will be verified and you will have your domain added to Windows Intune (as I have my marak.biz domain). In rare cases you will have to wait up to 72 hours to verify your domain (as you can see in disclaimer).

clip_image005

If you don’t have time to wait. You can click “cancel” you will not lose changes you made. Your domain will be prepared and waiting for verification.

clip_image007

Have nice day

Windows Intune – part 3. – Adding users. (survival guide)

Windows Intune supports integration with Active Directory, Office 365 and Windows Azure AD. Office 365 and Windows Intune use same user database (if you have same @domain.onmicrosoft.com). Today I will describe how to add users in Windows Intune.

Adding users without any connection is simple. When you log on to https://account.manage.microsoft.com go to Manage – Users and then click New. UserManage

Here you can choose between adding one by one (or only one user) or add multiple users at once (Bulk add.)

If you choose to add one user you will be redirected to this screen.

Adding User1

Required data is only user name and display name. You can also choose domain if you added your domain to Windows Intune before. If you want to add additional details you must expand screen (on triangle), and then you will have same options as screen above.

After you fill desired and required data click next. Then you will be redirected to next screen. Here you can assign role and you must add location (country for this user)

Adding User2

Choose Windows Intune group and press next. Type user mail address to send it username and password for Windows Intune access.

Adding User3

Click create to finish user creation.

For bulk add go to Manage – Users – New, and choose Bulk add. Next screen will be opened.

BulkUser1

Download both file, blank and sample .csv. Create your .csv file from blank based on sample and then upload file. When you press next verification will check if everything is OK. If you receive error you will be able to see where error occurred and why

BulkUser23

If everything is OK you will have screen like this

BulkUser4

Set Sign-In status and location

BulkUser5

Set group to Windows Intune. On next screen set email address. All usernames and passwords will be sent to this email address. Press create.

Now you have users added in Windows Intune . About Active Directory synchronization and Windows Azure AD I will write later.